My Pages

Wednesday, June 26, 2013

A Little Bloglovin =)


          So as some of you are aware, Google Reader is going to be non existent within a week. So for those of you are wanting to continue following my blog, please join Bloglovin here. Just look for this widget to your left on my page!


There is even a cool app for your phone so you have all of your favourites in one spot here..... right at your fingertips. Stay crafty my friends! =)

Sunday, June 23, 2013

Patchwork Ellie With a Little Oldtime Owen..... =)

          This has been a super busy week with posts for me, 3 in the last week! Christine asked me if I would do a special post using 2 of her images, Patchwork Ellie and Oldtime Owen. How could I say no? They are simply adorable.....


       I used Copic markers to ink these 2 lovely stamps up. I used my favorite skin colour combo on both of them, E000, E00, E11 and R20. Their hair colour is also the same using E50, E51, E53 with a dash of E55. Their matching outfits were done with V12, V15, V17, BG34, BG57 and BG49. Old Time Owen's pants were done with E41, E42 and E43. The flowers and grass around their feet are inked with YG23, YG25, Y08, YR09, RV25 and Old Time Owen's bouquet is done with R46. Cutest couple EVER huh?        


          Both cards were made with Gina K Kraft card stock and both are square cards that are 5.5X5.5" size. I used MME Lime Twist paper on Patchwork Ellie and MME Miss Caroline's Dilly Dally patterned paper on Old Time Owen. I added some cool embellishments to both cards to tie them all together. Hope you enjoy..... stay crafty my friends......

Friday, June 21, 2013

The Paper Nest Doll's Summer Release Blog Hop =)

Welcome to The Paper Nest Dolls' Summer Stamp Release Blog Hop!


Today the very talented and creative design team of The Paper Nest Dolls has put together this hop to share with you projects made using our 14 new stamps!


Second Row: Dollhouse, Girl Talk

Digital versions of these stamps regularly sell for $3.00 each, but from today through Tuesday June 25th you can get ALL 14 images for only $25 here in our shop! AND all rubber stamps are 20% off, however in order to get the discount on the RUBBER STAMPS, please email Christine at papernestdolls@yahoo.com and she will send you a Paypal invoice.

I decided to make a card celebrating July 4th's Independence Day using Sparkler Ellie. She is absolutely adorable.....


          The image was printed on Make it Crafty blending card. Sparkler Ellie was inked up using Copic markers, my all time favorite medium. Her skin was coloured with E000, E00, E11 and R20. I inked her hair with E50, E51 and E53. I could not resist the good ol' red, white and blue, so I inked her dress, hair accessories and shoes using B18, B24, B28, R37, R39 and R89. Grass, flowers and sparklers were done with G24, FYG1, Y68 and YR04. I also used some Diamond Stickles to add some bling to the sparklers and parts of the dress.


          Here is the finished card...... I used Gina K Kraft card stock and made a 5.5X5.5' square card. I used Bo Bunny's Anthem patterned paper. I heavily distressed the edges of all the layers of this card using Tim Holtz Distressing Ink in Walnut Stain. I used Label 1 to cut out the inked image and framed it with royal blue card stock which was cut out with Label 16 from Spellbinders. {They work perfect together!} I also used Diamond Stickles on every single star as well as outlined the card to help bring out the "sparkle" in the card. I tied it all together with a deep red ribbon and some rhinestones in blue and red.

We couldn't host a blog hop without fun giveaways! One lucky winner will receive our entire set of new images, one lucky winner will receive a $25 gift certificate to our shop, and another lucky winner will receive the summer prize pack pictured below!


Participants must comment on every stop of the hop and be a follower of our blog for a chance to win! We also encourage you to become a fan of our Facebook page!

Winners will be announced on Wednesday June 26th over at


You're next stop is Lori Ann's blog 

Here's the complete lineup:


Thanks so much for hopping with us! :)

Tuesday, June 18, 2013

Everybody Loves Ladybugs......

         As long as I can remember, I have always loved ladybugs. With this project I am about to show you, I decided to step outside of the box and do something a little different for myself. It is not your typical card that you would see from me but a tag, that is right folks, I made a TAG. A really cute tag using Ladybug Emma. You can find this stamp here. I decided I needed to try something different as I always complete cards, usually because I need them for something. It was time for something different.....


           With Ladybug Emma, I used Copic markers to ink her up. Her skin was coloured with E000, E00, E11 and R20. Her hair was inked with........ Her dress I did with R37, R39, R46 and R89. The dots are done with C3, C5, C7 and C9. I used Diamond Stickles to add some sparkle. The grass was done in YG03. The flowers were inked with V12 and RV34.


          I cut the tag shape from the Cricut machine using Tags, Bags and More. The tag is 6.5" in size. I used Gina K Kraft card stock. As you can see, I distressed everything using Tim Holtz distressing ink in Walnut Stain. I used black card stock and Pebbles patterned paper. I added some jazz with the cream coloured lace, black feather from Bella Blvd and some cheese clothe. The final touch was the red satin ribbon. This was definitely out of the box for me but I am very happy with how this turned out. Hope you enjoyed..... stay crafty my friends..... =)

Friday, June 14, 2013

Welcome to Wonderland, Tea Anyone??

          I could not pass up the opportunity to take part in this special new release when I was asked by Christine. I absolutely ADORE this stamp and fell in love with it immediately. Her name is Teatime Ellie and she is part of Christine's Wonderland theme....... and wonderful it is......


          How cute is she? ADORABLE....... I inked her up with Copic markers. Her skin was done with E000, E00, E11 and R20. Her hair is inked with E50, E51 and E53. Her dress, shoes and hair accessories were coloured with B00, B02, B04, B05 and B06. Her apron was inked with C0, C1 and C3. I also added some sparkle to her shoes and hair accessories with Turquoise Stickles.


          I found this little wooden teapot and thought it would be perfect for this card. I covered it with My Mind's Eye Stella and Rose patterned paper and distressed it with Tim Holtz distressing ink in Walnut Stain. I stamped it with a sentiment "Warm Wishes" from the Paper Smooches "Hot Concoctions" stamp set.


          I made this 5.5X5.5" square card from Gina K Kraft card stock. I used Turquoise card stock to add pops of colour. The first layer of patterned paper is Lilybeedesign's "Sweet Shoppe". The other patterned paper is My Mind's Eye Stella and Rose. I used Spellbinders Label 1 and 16 to cut out the image and frame. The heart border is called Layered Heart Border from MFT Die-Namics die cuts. I heavily distressed all the layers {including the card} with Tim Holtz Walnut Stain distressing ink. I tied in the bling with the rhinestones at the corner and I added faux stitching and dots with the Signo Uniball white gel pen. This is it..... hope you love.... stay crafty my friends.....

Tuesday, June 11, 2013

Graduation Is Around The Corner........ Woot Woot.....

          It is that time of year again.... graduation.... and I am sure there are some extremely happy and excited people who get to begin a new phase in their lives whether it be right out of high school or university. I remember it like it was yesterday, receiving my degree in Nursing. That was a HUGE accomplishment for myself. A co-worker of mine had asked me to make a card for her to give to one of her good friend's daughters who is graduating from high school. So here it is.....


          So I absolutely LOVED the way this card turned out. I had a really hard time figuring out what to do but once I started, it all seemed to flow together. Of course, I used Gina K Kraft card stock and made an A2 sized card. I heavily distressed all the layers {including the card}with Tim Holtz Walnut Stain Distressing ink. I also added faux stitching with a white Signo Uniball gel pen. The patterned paper is used was My Mind's Eye "Moments".


          The image I used was The Paper Nest's Graduation Ellie, who is available here! I inked her up with Copic markers. Her skin was done with E000, E00, E11 and R20. Her hair was inked with E31, E33, E35, and E37. Her cap and gown were done with N0, N1, N3 and N5. To add some pops of colour I used B28 for the shirt, hair ties and ribbon around the diploma. I also used R27, R39 and YG17 for the roses. The diploma and flower wrap was done with E41 and E42. I also went around the image with B000, B00 and B01.


          For a final touch, I added a diploma I made with rolled up paper. I tied it with a black string and really distressed the edges with the Tim Holtz distressing ink in Walnut Stain. I thought it was perfect for this card. Hope you enjoy this as much as I did making it...  Keep it crafty friends....=)

Challenge Entered

The Red Carpet - Graduate Theme


Let's Help A Girl Out.....

          A really cool girl I know (through the design team I am on) is having a 2 year anniversary blog hop on her blog June 15th - June 17th. I think each and every person should visit her blog and check out her creativity. She is amazing...... her name is Ashley and her blog is Made Especially For You.


          There are going to be some amazing prizes and of course, crazy creativity! She is 19 followers away from 700 people....... Isn't that wild? So if you would like to win this awesome prize below go here, find the post about the 700 followers give-away and share it on your page. Also, don't forget to comment on the give-away post to let Ashley know you helped out and to be entered into the draw. She will pick a winner on Thursday, June 13, 2013. Good Luck everyone....


Friday, June 07, 2013

Avery's Sixth Birthday Blog Hop!!!

Welcome to Avery's Sixth Birthday Blog Hop! We're so glad you could join us.


Avery is one of our dolls and she has just happened to have a birthday! In honor of her sixth birthday, the design team put together a hop to share projects made with the brand new "Avery's Birthday Surprise" stamp now available in both digital and rubber!


What a fun stamp! Avery was sure excited to see it. :)

Now onto my project for today... 
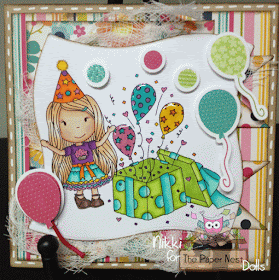
First off, HAPPY BIRTHDAY AVERY!!!! Who can resist this little darling? Seriously? I had so much fun inking this baby up and making her into a card was even more fun, I only hope that our critique, Avery loves every single card that we have made in her honour.....

I wanted to make her as bright and cheery as I could, something tells my the real Avery is just that, full of fun....
I used Copic markers to ink her up.
Skin: E000, E00, E11 and R20
Hair: E50, E51 and E53
Her Outfit, balloons and confetti: BG11, BG15, RV34, V15, V17, V18, YR04 and YR07
Shoes: E74 and E77
Cupcake Liner: E40, E41 and E42
Present: YG00, YG03, YG25, BG11 and BG15
I also added Glossy Accents to the balloons to give them a shiny look.


The card is a 5X5" card back made by Gina K Kraft card stock. The patterned paper is by Pebbles called "Sunny Side". I added the balloon stickers to add some dimension. They are Autumn Leaves Fall Balloons. I distressed the layers with Tim Holtz Walnut Stain ink. Faux stitching was added using a Signo Uniball white gel pen. Oh and I almost forgot the cheese clothe..... =)

And of course we have some super fun blog candy to thank those who come and hop with us!

1 winner will receive this scrappy prize pack:

1 winner will receive a $25 gift certificate to our online shop:

And 13 winners (one from each hop stop) will win the Avery's Birthday Surprise digital stamp!

Blog hop winners will be announced at The Paper Nest Dolls blog on Tuesday June 11th.

And now for your next stop of the hop - Lydia's blog! 


Happy Hopping! We also hope you join us again in two weeks for our SUMMER RELEASE BLOG HOP!


Online Copic Class Anyone??????

          So I am really excited about something I just registered for..... I know that I am certainly not a beginner with Copic markers but I could stand to learn a lot more in the use of them. So 2 of my favourite bloggers, Kristy from The Odd Girl and Melissa Andrews from Melissa Made are holding their online Copic Basic Class starting July 1st, 2013. If you are wanting to learn some tricks of the trade from 2 very talented ladies I would suggest heading over to Created from Color and register now!
          I would love to eventually get certified but it is not easy when you are from Canada, they do not offer many options for classes on the West Coast....hopefully soon!... I will pray to the Copic Gods anyways....... until then I will be joining these lovely ladies for some Copic learning... =)

Wednesday, June 05, 2013

Stay Tuned....... =)

          I was trying to post this on my sidebar and unfortunately it was too big and I can not alter it because my blog was designed by LuLu Ink. So I am going to post it instead.........


          Our designer's daughter and one of the stamp lines muses is having her 6th birthday this weekend. Our design team is going to celebrate by having a blog hop/release of an awesome new little stamp with Avery in mind. Please join us on the 8th for great inspiration and great prizes...... =)

Saturday, June 01, 2013

Are You Feeling Groovy?

          Oh it is so nice to be back to the blog posts........ I really enjoyed my 10 weeks on the challenge blog but it IS nice to be back........ I was at Michael's recently and found these really cool wooden pieces and my mind started racing as to how I could use them with my cards.... well today's post is going to show you exactly what I was thinking about..... the idea popped into my head almost immediately and all I did was pray that no one else on the design team had picked this image yet......
          I was so lucky because no one had so I signed up and got busy...... I chose Hippie Chick, she is available here! I wanted to do something bright, cheery and super colourful. This is what I came up with....


          Of course I used my favourite medium, Copic markers to ink this adorable little stamp with. This image was printed on Make it Crafty Alcohol blending card. Her skin was inked with E000, E00, E11 and R20. Her hair was done with E50, E51, E53 and E55. Her pants were done with BG02, BG05 and BG07. Her belt was YG03 and YG25. Her shirt was done with RV21, RV23, RV25, Y15 and Y18. Grass was inked with G21 and G24. The flowers were done with YR04, YR07 and G24.


          Here is the wood piece I was talking about. I covered it with patterned paper from Glits called "Unchanted Waters", I cut it out with an exacto knife, filed and distressed the edges with Tim Holtz Walnut Stain ink. Isn't it adorable? It was perfect for this card.... =)


          How groovy is this? Totally loved making this card. It was so much fun. The card is 5.5X5.5" square card made out of Gina K Kraft card stock. I used MME's "Happy Girl" patterned paper. There are some wooden heart shapes from Simon Says Stamp. The sentiments are from MFT's "Farout" and Hero Arts "PSSST" stamp sets. I added some cheese cloth and did some faux stitching with my Signo Uniball gel pen in white. I really hope you enjoy it.... I loved making it =).